Tuesday 27 May 2014

IBM WebSphere Application Server and Web Plugin for Apache on Linux - part 2

Ok, now we can install WAS.

Steps are:
1.Download it.
Files are


was.repo.8550.basetrial_part1.zip
was.repo.8550.basetrial_part2.zip
was.repo.8550.basetrial_part3.zip

Move them to your server.

2.go to location of was.repo* files
server1:/opt/2 # ls
was.repo.8550.basetrial_part1.zip  was.repo.8550.basetrial_part3.zip
was.repo.8550.basetrial_part2.zip

3.Unzip them
server1:/opt/2# ls
Copyright.txt                       readme
Remote_Installation_Tool_for_IBM_i  repository.config
disk1                               was.repo.8550.basetrial_part1.zip
disk2                               was.repo.8550.basetrial_part2.zip
disk3                               was.repo.8550.basetrial_part3.zip
lafiles


4. Start IM

Start IM, add repository so that IM can see WAS installation.

server1:/opt/IBM/InstallationManager#./launcher


Follow steps.
5. Install WAS

After you have insert repository, go to first page of IM, click install. There you can choose which IBM software to install. As you can see in picture below I already have WAS, IBM HTTP and WEB Plug -in for WAS installed.


Select WAS and follow steps.
WAS is installed in /opt/IBM/WebSphere/AppServer.

6. Start WAS

After installation is finished, start WAS.

server1:~ # /etc/init.d/server1Node01_was.init start

Open web browser on you local machine.

https://IP_SERVER1:9043/ibm/console


Log in.
 
This is WAS administrative console. IBM call it Integrated Solutions Console(ISC).

 
In case that you can not get log in screen, check few things.
1.Iptables on server. Port 9043 is needed for Integrated Solutions Console. Once you connect to ISC, you can see what other port you need.
2. Check if your service is running

sles11:~ # ps aux |grep java
root     11526  0.1 17.4 1062664 685088 ?      Sl   May12  38:01 /opt/IBM/WebSphere/AppServer/java/bin/java -Declipse.security -Dwas.statu .....


3. Check logs of WAS.
Location is /opt/IBM/WebSphere/AppServer/profiles/AppSrv01/logs/server1.
Look in SystetErr.log and SystemOut.log

In case that you can not find logs, use this

server1:/opt/IBM/WebSphere/AppServer # find . -name *.log


Monday 26 May 2014

wordpress - move position of menu from right to left/center in twentyfourteen theme

To change side of your menu in main menu from right to left do next thing.
In style.css in this section

 /* Primary Navigation */

        .primary-navigation {
                float: right;
                font-size: 11px;
                margin: 0 1px 0 -12px;
                padding: 0;
                text-transform: uppercase;


or in line 3355(to be specific) change right to left/center  and that is that. In margin section you can change margins of menu position.

Save file and that is it!

SED how to replace sample in only first/last n lines of file Linux SOLVED

Recently I came across this problem. I had to find in config file where settings for something is located. I only know that I had do change words "right" to "left" somewhere in that file that have more than 4000 lines and that in that file in 70 lines there are line that have right inside.

With SED I replace all "right" with "left" so I do know that is somewhere in there but what line exactly?

Real question is how to replace one pattern with other but not in whole file but in for example 2 first lines so that you can narrow your search for that particular line?!?

Here is one solution for this problem!

root@ubuntus1:~#for i in `grep -n text1 sample.txt|head -2|awk -F: '{print $1}'`;do sed -i "$i s/text/test/g" sample.txt;done

Here are explanation!
Content of sample.txt file is

root@ubuntus1:~# cat sample.txt
text11
text21
text12
text22
text13
text23
text14
text24
text15
text25

and you want to replace first two appearance of pattern text with test in lines where there is text1 pattern.
After executing above line result is

root@ubuntus1:~# cat sample.txt
test11
text21
test12
text22
text13
text23
text14
text24
text15
text25


Maybe there is more elegant solution for this but this works for me.

IBM WebSphere Application Server and Web Plugin for Apache on Linux - part 1

There will be several parts on this subject!
I will focus more on setting up Web plug in for Apache.

INTRODUCTION:

WebSphere Application Server(WAS) is name for IBM solution for web based application solution.
It is Java based server.
Administration of  can be done through web browser or console. It is a lot easier to administrate if through web browser(more user friendly).
On WAS you can start several different application.
You can access these applications directly

http://IP_OF_WAS_SERVER/APPLICATION

or by accessing web server that is connected (or associated) with WAS.

One WAS server can be connected with more that one web server.
Picture below may help you understand this logic.


You can think of these web servers as interfaces to approach your application that is running on WAS.

Ok, so lets create test environment. We need to install WAS on server1, Apache server on server2.

Installation of WAS

To install most recent WAS version(8.5.5.0) first you need to install IBM application called Installation Manager(IM). Earlier version did not need IM for installation of WAS. I can't find now link to this on IBM site(it took a quite some time to find it).
Package name is agent.installer.linux.gtk.x86_1.6.2000.20130301_2248.zip.

Installation of Installation Manager:
1.this is hardest part.Find (damn) package
2.copy it to server.
3.my location is /opt/1
server1#cd /opt/1
server1:/opt/1#ls
agent.installer.linux.gtk.x86_1.6.2000.20130301_2248.zip
server1:/opt/1#/unzip agent.installer.linux.gtk.x86_1.6.2000.20130301_2248.zip
.
.
.
server1:/opt/1 # ls
Offerings  features   install   jre_6.0.0.sr9_20110208_03  repository.config userinst agent.installer.linux.gtk.x86_1.6.2000.20130301_2248.zip  groupinst   install.ini  license                    repository.xml userinst.ini configuration  groupinst.ini   install.xml   native               silent-install.ini       userinst consoleinst.sh    groupinstc      installc      plugins                    tools               userinstc.ini documentation   groupinstc.ini  installc.ini  readme_1.6.2.html  user-silent-install.ini

4.run program install
TIP: to install it you need to have Java of course!
TIP: if you do not have graphical environment on your server, you need to have it to install IM or WAS

server1:/opt/1#./install


Follow steps.
After installation is finished, you can start IM.

server1:#cd /opt/IBM/InstallationManager/eclipse
server1:#./launcher


From here you can install all other IBM WAS products.

Thursday 22 May 2014

wordpress-remove search bar from menu in twentyfourteen theme

To remove search icon from menu, do next thing:

1. open header.php

    #vi wordpress_home/wp-content/themes/twentyfourteen/header.php

2.remove following lines

<div class="search-toggle">
                                <a href="#search-container" class="screen-reader-text"><?php _e( 'Search', 'twentyfourteen' ); ?></a>
                        </div>


3. save file

That is it!
I suppose you can do same thing on some other theme!

Wednesday 21 May 2014

iso repository on SLES11 and openSuse11 EXPLAINED!

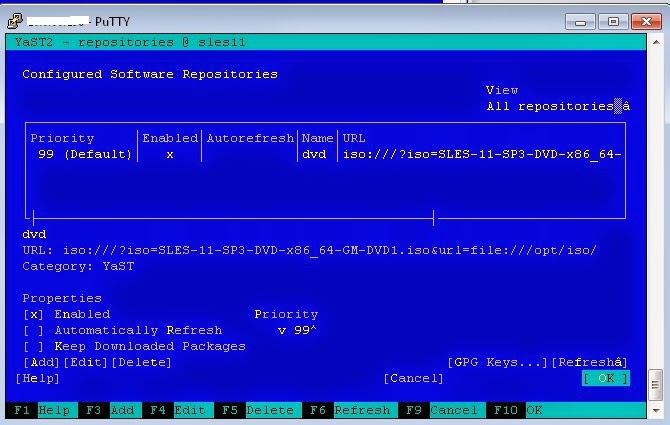
In case that you do not have support/online repository for SLES server on Novell here is how you can create local repository from iso file that is located on local file system.

Why do you want to enable local repository? In case that you do not know what term dependency hell means, you should try to install one  rpm that is dependent on some another rpm's and probably that another rpm's are dependent on some another rpm's and so on and so on... So from that one rpm package install, you will end up with few hours of searching for dependencies rpm's. That is dependency hell.

To avoid this, you need repository and package manager program. In SUSE like distros that is called zypper and in Red Hat like distors that is called yum. With these you can do all manipulation with packages(install,remove,update,upgrade, info) and best thing is that they know how to resolve dependency issues. That means that from just one line in console you will install all dependencies for packages that you want to install. This will save you a lot of time and lots of nervs!

In case that you do not have experience with SUSE like distributions (SLES or openSuse), they have something called yast2. yast is for yet another setup tool. 2 is for second generation.
yast2 is configuration and management tool(it will be detailed explained in some other post).

First you need to copy iso to your file system.

server1#mkdir /opt/iso

copy iso to this location.

server1#yast2 


 and that is it!

How to test if this works?
Try to install something. For example  try to install wireshark

server1 # zypper install wireshark
Loading repository data...
Reading installed packages...
Resolving package dependencies...

The following NEW packages are going to be installed:
  libadns1 wireshark

2 new packages to install.
Overall download size: 12.0 MiB. After the operation, additional 64.1 MiB will be used.
Continue? [y/n/?] (y):

As you can see, libadns1 will be installed because he is dependency for wireshark.

Tuesday 20 May 2014

How to enable X11 forwarding in ssh session,how to do it in putty and why EXPLAINED!

What is X11? This is X Server for Linux. In simple words, it is graphical enviroment.

What is X11 forwarding? This means that you can connect on remote server trough ssh session and run services with graphical enviroment that are running on that remote server.


How to acomplish this through ssh session?

server1#ssh -X server1
server2#

Now that you are connected, easiest way to test if X11 forwarding is enable is to start xclock.
xclock is graphical clock.

server2#xclock  

xclock window should appear.

Of course this means that you have graphical enviroment on server1 and server2.


Now for connection through putty...
Putty is client for ssh and telnet connection. It is used for ssh connection from windows machine to Linux servers.
To enable X11 forwarding, you have to install Xming. Xming is X Server for Window.
Step are:
1. Install Xming
2.Start Xming
3.Start putty
   After entering IP address or hostname of server that you want to connect, you have to enable X11   forwarding.


And that is it.

Test X11 forwarding by starting xclock.

Why do we need X11 forwarding? Some applications need graphical enviroment for installation, sometimes you need it to troubleshot something.

I hope this will help you!

Tuesday 13 May 2014

Start/stop/restart EMC Networker service on Linux

In case that you want to start/stop/restart EMC Networker service on Linux here is what to do:

1. Start service
#/etc/init.d/networker start

2. Stop service
#/etc/init.d/networker stop

3.Restart service
There is no restart. Use stop+start instead.

IMPORTANT  TIP:
Always, and I mean always be extra careful with restart of networker service because when in hurry you can by accident stop network of your server. In case that you do this and you do not have remote console approach you are basically in BIG trouble.
This has nothing to do with networker service by it self but only with similar names of services in /etc/init.d. 


Wednesday 7 May 2014

Start/stop EMC Networker service on AIX

In case that you have to start/stop EMC Networker service on AIX, here is what you need to do!

Start service:
#/etc/rc.nsr start

Stop service
 # nsr_shutdown
Stopping service: nsrexecd (22347918)
Waiting for service: nsrexecd (22347918)
Service nsrexecd (22347918) shutdown.


Sunday 4 May 2014

Turn old android phone in to ....

.... torrent client!In my case old phone is Huawei U8650!
What to do?
You can install some custom ROM but this is not necessary. I did this because I wanted to make my phone application free as possible!

OK, for torrent client part. I installed atorrent application from Google play.
How to start downloading?
1. Go to some torrent site(in my case kickass.to) through web browser
2. find what you want, click on magnetic icon. atorrent application will start. This will ask you where do you want to download torrent file. Choose location.
3. If download do not start automatically, go to file manager,find torrent file you have downloaded and click on it. This will start atorrent application. Start download.

In atorrent application you have few important options. I think that most important is to choose that downloads only use wi-fi connection and not GRPS.

Of course, depending of size of your sd card you will need to delete/transfer files from it more or less frequent.

Hm...
You may wonder what is point in using your (old) phone as torrent client?
My points are:
1. phone is always on
2. in many coffe shops or caffes or somewhere where you have free wi-fi you may have much faster internet than you have in you home


Good luck! :)